JJ Abrams Tricorder
002
TAKING IT APART
Now, please bear in mind that from this page onwards, you have to remember that
I am going to modify this Tricorder and this will invalidate Starfleet's Preventive Maintenance
Programme. This project took me weeks to complete as I was doing this in my spare time
and
I am very confident that there will be some boo-boos since I am doing this after
midnight when the kids are asleep. Most of these will be in note form
since I will be documenting it as I go along and taking pictures as often as I
can.
The main aim of
this project is to modify the screen part of
the Tricorder to have flashing LEDs. After looking at the screen, a colour LCD
is out of the question since the "display" area quite small and space below it is
quite limited. Not only that, there are no LCD screen small enough to fit into the toy. And
so, my only option is to use LEDs and play with their flashing sequence. However, I wanted
the LEDs to be different as well. So, I sourced for some dual-colour (Yellow/Blue)
square LEDs.
 |
 |
 |
|
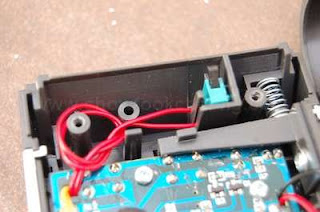
There are only four screws holding the two halves of the
toy. And each half has further screws to hold the chrome parts. Looking at
the space inside the toy, the circuit would have to be very small. The
whole of the toy's sound and light is all on the blue circuit board which
takes four screws. Notice the speaker area which has an echo chamber to
amplify the mini speaker. It is very effective.
|
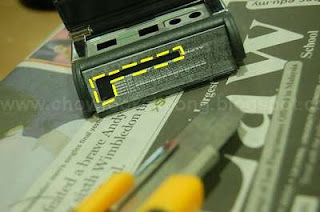
Just above the circuit board, is the area which I will
modify. Initially, I thought of cutting the whole piece off but after some
thoughts, I decided making small holes would be much better. Although the
plastic used by Playmates this time is stronger, I am not taking any
chances. Yes, their 10-year old TNG Tricorder's plastic was very soft. And
take note of the green cover switch as we'll be discussing about it later
on.
|
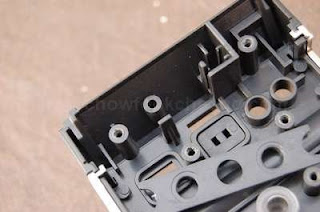
After
removing the circuit board, you can see that there are some more parts mainly, square covers for the push button switches
and also plastic lens for the three LEDs with a
bar to secure them all. And yes, all using screws. For this part of
the toy, I will need to remove the chrome plastic as I do not want to
scratch them accidentally while I was working on the cover. Make sure you have
a box to put these pieces somewhere.
|
REMOVING THE SCREEN
STICKER
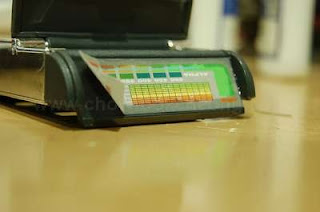
The Tricorder screen, funnily enough is
just a sticker. There are no lights underneath to light it up. Because I do not
have a high quality printer, I will need to preserve this sticker until the end
of the project where it will be needed again. In order to do this, I would have
to move the sticker (intact) to a more robust media.
 |
 |
 |
|
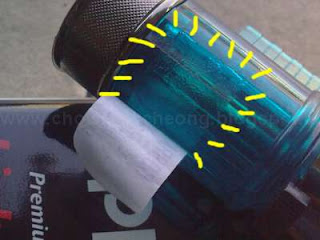
This is the sticker, which measures almost 6cm wide.
Unfortunately, its made of paper and it will be very fragile. The only way
to remove this sticker in one piece and without much warping, is to use
the Zippo Lighter Fluid.
|
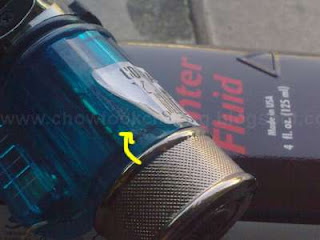
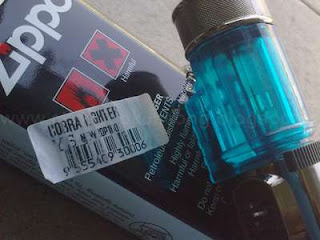
All you need to do is to slowly start in one
corner, with just a few drops of the fluid. The main purpose of the
fluid is to weaken the sticker's gum. Slowly peel the sticker bit by bit,
using generous amount of the fluid.
|
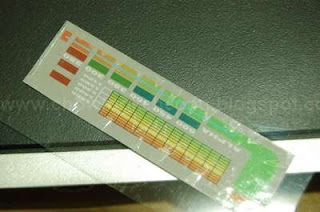
Surprisingly, or maybe its the quality of the
gum, when I transferred it to a transparent acetate, the gum still works.
This is good. But then again, this is my second try. I found out a lot of
people use Zippo to remove price tags, especially toy
collectors.
|
 |
 |
 |
|
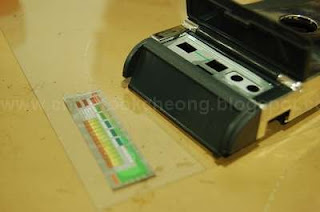
My first
try was with a lighter I bought. I started off with one corner, and slowly peel the sticker off bit
by bit and putting drops of the fluid at the same time. In other
words, peel when wet but very very gently. This is also a good time to
test your patience.
|
Here is
the part where I was worried because while I was peeling the sticker, I noticed that the
gum is still on the lighter, which did not go away. So, the fluid sort
of interferes with the gum when its "wet". Once its dry, its another story
altogether.
|
So, once
the lighter fluid dries off, the gum becomes sticky again. I was also worried about the quality of the
pulled sticker as you can see, some of the markings were affected. But
that's laser printing for you, as the hardened toner powder does not flex
really well.
|
 |
 |
 |
|
Another
theory would be, maybe I should have wet the whole sticker and wait for it
to weaken so I can slide it off.(Yeah, OK, so the theory sucks) .The reason is, the
peeling action did warp the surface a bit. But after leaving it for weeks,
the sticker was normal again.
|
Even when
the sticker dried off, the stretch marks and other weird bubbles were still
there. I was so tempted to recreate this sticker and then print them onto
a translucent media but I do not have any (free) software to do them nor a
good printer.
|
And
because I used a lot of fluid, they flowed to other
places which they're not supposed to and in doing so, spoils the sticker.
But later one week after it dried, there were no marks on it. Maybe its
because I left it alone.
|
PREPARING THE SCREEN
With the sticker out
of the way, we can now proceed to
cut away the hole needed for the LEDs. This is where the first problem came about, in terms
of available space. When I was examining the toy, I was afraid that there
would be insufficient space under the area where the green flap switch is, and
also, some the screw pillars which has to be removed as the LEDs needed these
space. But lets continue.
 |
 |
 |
|
Using a photocopier, I made a cutting template from the original
sticker and pasted it to the toy using a thin double-sided tape. I
wanted to use the blade to simply scribe the lines and eventually get the
part off. This is not only time consuming but creates unnecessary
scratches.
|
And so, the drilling
and the grinding starts. I made a mistake of not using newspapers to cover and also catch the dusts as they were
literally everywhere. Although the plastic is tougher than the TNG toy, I had
to use low speed so as not to create melted residue, a mistake when
I though speed as everything.
|
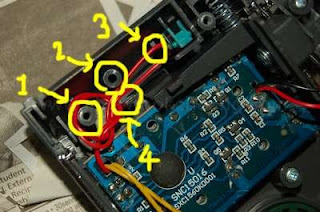
The critical screw pillar (1), which is one of the four
screws to hold the two halves together, is the first to go followed
by the other pillars (2) which fortunately, has no use. But the switch
area definitely needs to be removed as well. This is the most critical
part of the project.
|
 |
 |
|
|
And so, with the parts grinded away, they are ready for
the next stage.
|
Here is how it looked on the business side. Nice and clean.
No crooked lines. (But the sticker can hide that)
|
|
I have also
measured the squares in the sticker and made some comparisons with the LEDs I am
going to use and they almost fit. I would say almost because although these LEDs
are 5mm wide and 2mm high, the horizontal part is the greatest problem. We'll
talk more about this in the next page.


